Perhaps it would have been a "good idea" to look up exactly how most people make starter planters out of newspaper. Instead I jumped it without much of a plan and tried out my own techniques. Now, I do not claim to be master origami-ist, paper folder, or package wrapper. The presents I give come wrapped in wrinkled, crooked, and homely paper no matter how hard I try to be neat. Luckily, these planters aren't meant to be pretty. The newspaper degrades just slowly enough to let some seedling pop-out and ready themselves for transplant. The material works much like a peat-pot but at a cheaper and perhaps a more eco-friendly cost.
The original Newspaper Planters that I saw were made with a round object-tool-thing. I only glanced at the picture and did no reading on how it worked. I tried first with drinking cup. However, newspaper apparently doesn't wrap well around a tapered object. The mashing to make a bottom didn't work well for me either; I was left with a big hole in my cup.I decided folding it into a square would be just as easy. I tried "wrapping" a miniature Chinese food box thing. Once again this object tapers. Didn't work out too well. Then I thought, oh why not just fold it? Who needs and object. Surprisingly, after a few prototypes, a functional folded newspaper planter emerged.
This is a quick photo-tutorial to let you my newspaper planter. So far they've held up pretty well. The other way to do it may be easier. Mine is a ten-step program.
Start with one sheet of newspaper. I cut half of a sheet to get this one (about 15x16). I don't think the size really matters. Maybe if you use a larger one you could fold it more to make stronger walls, but then again that might make it harder to fold.
1. Anyway, fold it in half until you have a skinny rectangle. I folded this one in half once, where the Auburn Orange line is.
2. Fold your skinny rectangle into five parts. These will be the four walls and a flap. Basically fold not quite in half and fold in half again. Where I folded is marked here in Auburn Orange squiggles.
3. Unfold the paper until you have your skinny rectangle back.
4. Cut about 1/3 the way down the creases, shown here as Auburn Blue boxes. Really, you can cut as much as you want too, as long as it's more than half the length of the "wall sections." The flaps that you are creating in this step will fold down to make the bottom, so make sure they will reach each other. Also: cut the edge-to-edge side of the skinny rectangle, not the middle fold side. This will make your pot stronger, and prevent dirt from falling into the newspaper.

5. Shape your paper into a prism, bending it at the creases, and wrapping the flap section around the corner of the first.

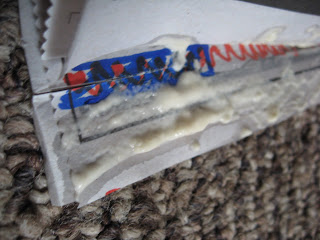
6. To make the flap stick to the first section, I used flour-water paste. It was about the consistency of toothpaste. Flour-water won't harm the plants, and it's really easy to make. I just used my fingers to spread it on. I guess you could get fancy and use a brush.
At this point, your skinny rectangle should be a rectangular prism with two open ends. It should retain it's shape without you holding it.
7. Fold down the flaps you cut to make the bottom. Start with the section where the two ends of the skinny rectangle meet to make sure that flap holds strong. Between each flap (and maybe between the layers of newspaper) spread some flour-water.


8. Once all four sides are down. Cover the entire bottom with a more watered flourwater paste. About the consistency you would use for paper-mache. This will make the bottom stronger.
9. Let dry overnight. You should have a fairly sturdy, somewhat cute, newspaper planter in the morning!
10. Fill with dirt and a few seeds. Water regularly, keeping the soil moist. These pots don't retain water very well. If seeding different plants, be sure to mark your pots. Here it's "LC" for Lemon Cucumber.
If you're confused (which is very likely, especially on step 4), leave a comment or email me or something. Or figure it out yourself.


No comments:
Post a Comment