Monday, December 20, 2010

Random Update

 Salad that I made from my garden! I added sunflower seeds, croutons, carrots, celery, ranch, and Parmesan. Delicious.


Shot of my lettuce, almost full grown. It's all eaten now.

Sunday, November 7, 2010

Goodbye Summer, Hello Winter!

Just as the calander changed, the weather changed. The last weekend of October the high was 77F. The first weekend of November the high was 55F. Dramatic no?

I decided to pull up most of the summer plants since most of them weren't doing too well.


This is the last of the summer harvest. A few green peppers that never turned red, some overripe lemon cucumbers and that small green thing - it's my one and only tomato. Not the most successful harvest, but whatever. That tomato plant was defective.

My basil plant is hanging in there. I brought it inside for the weekend. There are SO MANY LEAVES on it. I'm planning on making a batch of pesto to freeze today. But it's Thai basil so it's a bit mellower and peppery (?) than traditional Italian basil. I've already dried half the limb because it was taking in way too much water. The plant has bloomed several times, and despite my best I think I didn't pinch them off soon enough. The next wave I'll let go to seed and keep them for next year. 


The winter plants seem to be doing well so far, especially the lettuce.


Blogspot is estupid and won't let me re- rotate the image that they incorrectly rotated, so this image is side ways. The top/left bunch is the Marvel of Four Seasons butter head, middle is the Tom Thumb butterhead, and the bottom/right is the Cimmaron Romaine. Tom Thumb is doing best, I'll be harvest some of this soon to make room.


This is the leek & carrot box. As you can see the leek doesn't look much different from onion grass. I was expecting it to grow faster, especially since the lettuce shot out overnight. The carrot are those little frond things. No sign of root yet.


Herbs have taken off! Left to Right: Sage, Oregano, Rosemary. I need to start cooking more!!! We made dressing/stuffing the other day with the sage. Barely made a dent in the plant but tasted wonderful!!


Backside of the pot is filled with pansies.
You can see the not as vivacious rosemary too.


And so say so long for now, a photo of the front door flower pot!

Wednesday, October 13, 2010

Taste of Success

I harvested my first cucumbers yesterday and they were extra delicious. I thought they'd be weird tasting because they look and feel a lot different than grocery store cukes. There really wasn't a flavor difference, but the freshness was quite noticeable- especially in the texture. They had the same texture has a regular cucumber, but ya know, more crunchy I guess. Fresher. 

The cucumber plant isn't doing too well though; I think I'll only get a few more off the plants. They just soak up sooo much water, I can't keep up. Plus I have an infestation of white-flies in all my plants. The flies are tiny and suck the juices out of the plant, restricting nutrient flow etc. Combining the drought and flies has caused half the leaves to wilt & die. We'll see how long they last though.

I also harvested some oregano (which is going wild in the strawberry pot) and basil (which continues to go wild) and let Nicholas make a delicious meal with them. He combined my herbs with some fresh garlic in home grown & canned tomato sauce and put that on a slice of Italian bread with sausage and cheese. The sauce was absolutely amazing and incredibly flavorful for the amount of herb put in. I meant to take a photo, but it was just too good.

My other plants are doing alright. The peppers havn't grown much later and I think they might have a disease; the pepper gets a soft pink spot on them when they are about 3in in diameter. I have yet to try one of the green peppers. The plant looks alright though. We have had cooler weather for a few weeks so I think it stopped going to fruit for awhile. Luckily, its back up to the 80*s and I might get a few more.

The tomato is lame with silly flowers and no fruit.

The carrots, lettuce, pea, and leek have all sprouted! The lettuce were out a few days after I put the seeds in. The leek followed and the carrot just appeared on Sunday. I'll be eating salad in no time!!


Sorry of the lack of pics- my memory card is full.

Sunday, October 3, 2010

Growing and Seeding

The weather has gone down a few degrees lately so I decided it's time to start the cool weather crops. The hot weather crops are doing alright, I suppose. With the cooler weather they don't take as much water and have not wilted at all recently. But, they do continue to grow.

Here you can see where the cucumber plant has grown over into the tomato area and is about to invade the basil plant.

I don't really mind it bothering the tomato; the silly thing has yet to produce one delicious tomato for me to feast on. It keeps blooming and blooming and blooming and blooming and blooming and NO FRUITING! I don't know what's it's deal, because I've seen pollinators. Both my cucumber and pepper plants have gone to fruit. Eh.


All that is exciting, but not as exciting as planting SEEDS!!!! WOOOOOOOO!

A few posts ago I think I said that I bought seeds from Seed Warehouse and was just waiting til the weather was right to plant them. I was bored yesterday and thought a productive way to procrastinate (oxymoronic, I know) would be to plant them.

Lettuce
I took one of my window boxes and made it just for lettuce. I have three different varieties and gave each a third of the window box. I planted about seven or so seeds for each variety to start out with. They recommend spacing lettuce about 6 inches apart.
  • Organic Marvel of Four Seasons Butterhead: I don't know what is organic about it. The website also had non organic but what does it matter if you're just planting seeds? Whatever. Butterhead lettuces "have outer leaves that do not wrap tightly together but rather deveolpe an open, fairly flat rosette surrounding the inner leaves" (Vegetable Factory). So these are the floppy ones that aren't iceberg or romaine looking but still maintain a ball in the middle. The Seed Warehouse described this variety as having "stunning reddish leaves flaunting cranberry red tips with excellent flavor make this lettuce a must for your garden. If you are looking for a lettuce that is both attractive and tasty, this heirloom may be your choice." They also say it's a good container plant that will grow to 12-16inches in diameter and mature in 55 days. 
  • Cimarron Romaine: A romaine lettuce, so long and skinny and delicious. This one is a deep-red color and is heat and cold resistant. Seed Warehouse says this is a good container plant that will mature to 10-12 inch long heads in 60 days. 
  • Tom Thumb: This is a miniature butterhead!! It grows to the size of a tennis ball so cute. Seed Warehouse recommends growing these in containers and using them for individual salads. They also say they can grow indoors fairly well. Hmm... Matures in 50 days.
 I also do a window box just for leek. I think I put about 9 seeds in it. The only variety Seed Warehouse had was the Large American Flag Leek, and I think it's the most popular variety here in the states (go figure). If you've never used leek before, you are missing out. It has a sweet, mild onion flavor that does not over-power like green onion can. American Flag takes 120 days to mature, so it's very slow growing and sensitive to heat I think. I'm keeping mine in the shade mostly.

I popped three Super Sugar Snap Pea in with my cucumbers. The cucumber's root system has taken over the window box so I'm not so sure the peas will pop out. Sugar peas are easier than regular peas because you don't have to shell them, and that is why I got the sugar snaps. They mature in 66 days.

I put some Little Finger Carrots into the top of my strawberry pot. These are miniature carrots that grow no larger than 3 inches.  These are the true baby carrots; the ones you buy at the store are just shaved down large carrots. Little Fingers supposedly taste sweeter and have a deep orange color. These mature in 57 days, and I plan on planting them in waves in various pots.

I also transplanted the mystery tomatoes from the pepper plant pot to their own window box. They were just getting super leggy and in the way. I did not plant my Corriander/Cilantro because 1) I forgot 2) I didn't know what pot to put it in. Next time maybe. I also just remembered that I have some mesclun (baby greens) stashed somewhere that I need to plant as well. Oops.

Hopefully in the next few weeks I'll be harvesting my peppers, which seem to have stopped growing, but aren't turning red, and perhaps a few cucumbers. And, goodness willing, I'll get to eat a tomato before it gets cold. In a few months I will be eating lettuce and carrots nomnomnomnom!!

Growing Cucumber

Sunday, September 19, 2010

Reading Materials

Now that I've sent Anna her birthday present, I can tell you about the book I've been using.


The backyard Vegetable Factory: Super Yields from Small Spaces by Duane Newcomb


It's a little outdated, but very helpful. Newcomb goes through the entire process of creating a 25 square foot garden with helpful tips, scientific findings, and concise writing. He does not focus on the aesthetics of gardening, unlike many other sources I've seen.

Obviously, I'm not gardening on a plot of land. He has a small section on container planting, but the book is more useful for its explanation of how to garden. It's quite hard to explain.

The first 130 pages or so are about starting seeds, pests, planning, etc etc etc. The other half of the book is basically straight up facts. He profiles types of vegetables and describes their particular needs. There is also information on freeze dates, vegetable time range, and vegetable companion suggestions. It also has bibliography that I haven't gone into yet.

The book also has some very nice diagrams and illustrations, which really helps me out. The only section that the pictures didn't help out was for the pests. Even that wasn't because they were poor illustrations. Rather it was that the drawings weren't the same size as the actual creatures nor were they colored. So it's a bit of a mystery.

Newcomb also considers the gardener's environmental footprint AND her pocketbook. He supports the re-purposing of objects and wholly supports organic growing. His compost section is excellent.

There is a lot to say about the Vegetable Factory, but you really can't learn much from it if you don't read it yourself. It really is good.

Pick it up at Half.com for $1.13 (hardcover) at the time of this posting.

Enjoy

Who would have thunk?

After weeks of ridiculing it, the pepper plant is officially the first plant on the terrace to go to fruit.

This just nine days after I saw the first blooms!! A few more fruits are coming out, but this one is the largest. My book says most bell pepper varieties take 60-75 days to mature. I got mine June 28 as a seedling, meaning I've had it 83 days. Who knows how long it was growing at the nurseries. What a poky pepper! I guess it was mature when I saw the blossoms at 74 days. So really it's right on time...?

Now for some pretty pictures of the cucumber blossoms:

Friday, September 10, 2010

An Elephant Flys!

The Pepper Plant is blossoming. There are about 4 open a few more buds sitting around.

Saturday, September 4, 2010

Pepper Plant Pests

The pepper plant finally has something interesting to look at.

Neither Nicholas nor I knew what they were. They look like little red ant-like things with long legs. Nicholas figured they were either Assassin Bug or Leaf Leg Bug nymphs (what comes after the larval stage but before they are fully mature). Apparently the two bugs are in the same family(?) and don't look much different from one another at this stage. After some interwebbing I concluded they were the Leaf Leg Bugs, before they have their leafy legs.

Click on Photos to Enlarge

Assassin bugs generally are lone creatures who stalk the stalks for other creatures to feed on. Leaf Legs gather together in wild packs, sucking the life out of leaves or burrowing into the fleshy parts of fruit. (Slight exaggerations). Assassin bugs are somewhat beneficial and leaf legs are not. I cut the leaf holding all the nymphs and tossed it over the balcony onto the nearby crepe myrtle. Hopefully they'll stay on it and not bother my planties.  

Sunday, August 29, 2010

My plants have been as busy as me!

     School started a week ago but if feels like three times that. But in a good way. I've been doing a lot of art stuff and my plant's haven't needed much tending to. That's a good and bad thing. They have been growing like weeds though. Goodness!! I think the new balcony has a lot more sun in the mornings; roughly five hours of direct light in the a.m. and seven hours of indirect light the rest of the time. A HUGE wisteria vine (I should say tree) shades the balcony keeping the temperature down, and I've trimmed it so it still lets light in on my plants.


All the plants have grown a good bit. The pepper annoyingly puts out more and more leaves. No blossoms or anything that looks like it could become reproductive. I think it's a dud. The basil seems to have a 1.5ft radius, and is becoming more flavorful. I like to chew on it as a breath freshener, hahaha. The tomato has gotten super tall, one branch being at least 4ft tall and the other not much below it. It also has a dozen or so blossoms, a few of which look like they'll go to fruit (crossing my fingers).

Now the cucumbers...


... they've gone buck wild. Those leaves are about 5inches across. I've pulled three seedlings, but the others are thriving. They naturally used the balcony siding as a trellis, soaking up all the eastern light they can.
In this photo you can really see how they poked their leafy heads through and started growing! The window box  down there just seems empty. I put bits of shell in it as a pseudo mulch. I don't know if it actually works.

One of the plants is growing down. It's leaves aren't as big, nor is the plant as tall/long, but it's doing alright. People below might have to watch for falling fruits soon. The packet says they mature in 60 days, so I've got about a month more to wait.

I'm also waiting to plant some new seeds I ordered from Seed Warehouse. They had a fairly good selection and somewhat local (Georgia). I got several lettuce varieties, snap peas, cilantro/coriander, carrots, and leek. The one thing they didn't have was Bok Choy. I think it's still too warm to put them out. We'll see how long I can hold out.


Oh, and last but not least my strawberry pot! The oregeno is doing the best, practically flowing out of the pot. The sage and rosemary seem to be carrying on alright. One of the rosemary isn't getting as much light, since its on the other end of the porch.  I want to put it down stairs at our entrance, but rather wait til it was full. I just don't know what to put in it. If you have any ideas, let me know!

Wednesday, August 11, 2010

Strawberry Pot

The last weekend in June, Nicholas and I went to Petals from the Past near Birmingham, AL. They specialize in antique roses, heirloom shrubs and hard to find perennial flowers and herbs. I went there earlier in the summer and got some half-price seeds, including the lemon cucumbers. Nicholas got a whole mess of perennials.

This time Nicholas got another mess of perennials, and so did I! They were continuing their June Special of "Buy two, get one free" and had their pottery half off! Their pottery collection was pretty awesome and fairly priced to begin with. What caught my eye was the Strawberry Pots. They had 3, 3.5+, and 5 gallon strawberries. I picked up the last 3.5g for $21.00. Excellent buy.

I had to fill this pot with something, and since it ws buy two, get on free I picked up some herbs. I got a prostrate rosemary, sage, and oregano. A regular rosemary that Nicholas brought me from work also went into the pot.

I forgot to take pictures of the finished pot, which is super cute, but here is the putting together of it. Whenever using unglazed ceramic, soak the pot in water overnight. Ceramic absorbs water, which makes it really good insulator and excellent at regulating soil moisture, but if you put soil into a dry pot it the soil will quickly dry out. Because my pot was large and funky shaped I didn't soak it underwater, but wrapped a wet towel around it and filled as much of the pot I could with water. Every few hours I re-wet the towel.


The bottom three inches of the pot has soil covering it. In the center I stuck a sodabottle to conserve space/weight. Around the bottle and on the sides where roots won't grow are packaging peanuts for the same purpose. 


When transplanting, I shoved the roots through the hole rather than the leaves. Roots are more robust and its good to break up the rootball anyway. I water it every day from the top and each plants' hole and sometimes spray the pot with water.

I'm not sure what I'm going to put in the rest of the holes. Nicholas wants some mint, but it's not my favourite flavor (except on lambies..mmm). I thought maybe green onions or spinach/lettus. Or just some pretty flowers. Don't let the photos fool you, it's super cute! I'll take another picture when I get the chance.

Updates

Remember my post a few weeks ago, the one with the photo of a tomato flower. Well, that and all the other blossoms have been falling off!

You can't really see well, but that stem in the middle of the photo used to have a flower on it. It fell off!! Now the books talk about a "blossom rot" which has to do with not getting pollinated because of water and the cold and so on, but I don't think it's that because it's not cold and they didn't rot. They fell off. 
A lovely lady by the name of Dianne Craig provided me a answer. She is an expert at growing things and has worked at both nurseriesy and orchards for a good portion of her life. She said that it's too hot out. Specifically, it's too hot out at night. If the nighttime temperature doesn't drop below 90*F or lower, it's very hard for tomatos to set fruit. Now we know.

The pepper plant shows no signs of flowering. It looks pretty much the same, just a few inches taller with a few more leaves.

The basil plant is huge, about 2 feet tall and quite bushy.

The potato plant died. I think it was too hot in that black container and the leaves kept getting sun damage. Oh well. I plan on guerilla composting in the woods behind my apartment when it cools down a bit. The potato will be the first thing in.

Also, Nicholas brought me some mystery seedlings from the nematology lab. Some a more than likely tomatoes, I put them in with the pepper plant since they probably won't make it through the fall. Who knows. A few are cabbage/broccoli/brussel sprouts/cauliflower/kohlrabi/kale. If you didn't know, all those veggies are the same species, just superbred to look and taste amazingly different. If it's kale it could also be ornamental (super bitter) rather than eating.Who knows. Another one looks like a bean or pea to me, but I have no reason for that other than it's growing very straight. Nicholas thinks its violas. Who knows. The last one is a complete mystery. Only a few of the plant's true leaves are showing and they are still quite undistinguished. Nicholas think they might be pumpkin. Who knows.

I'll take pictures when I can and hopefully we'll unravel the mystery together!!

Cucumber Transplant

On June 28, 2010 I decided the cucumber seedlings were big enough to transplant. My books say that once seedlings of most any kind of plant have put out their second set of "true" leaves (their third set of leaves), they're ready to transplant. The intial pair of leaves are cotyledons and look pretty much the same for all plants. The second pair of leaves look distinctly different and more like the type of plant. If you look hard you can see the cotyledons on the demo-pot seedling- they blend in with the true leaves.


The new seedlings were going into one of my new "Self Watering" window boxes that I ordered from walmart. They were the cheapest 30" window boxes that I could find. I think they're fairly good quality and, besides having to wait half an hour for the people at walmart to pay attention to me, it was a painless purchase.


I wasn't sure how best to transplant the newspaper pots. At first I was going to plant both with and without newspaper. Taking off the newspaper and looking at the root systems was a bit more fun than I thought it'd be. So, all the plants had the newspaper taken off. A few kept the bottoms. NOTE: My vegetable-growers books said NOT to transplant cucumbers like this. They aparently have very tender roots that don't like to be disturbed. If you are starting a cucumber patch of your own, the experts recommend sow them directly into the pot/ground you want to grow them or use biodegradable pots to seed them.


I filled the windowbox about half way with very damp dirt. I wish I had put more in beforehand, so there would be extra room for the roots to explore.


A double seedling pot on the left. Close-up on the right, look at its root! And the seedcase.


There are ten seedlings in this one 30" pot. The books recommend spacing cucumbers about 10" apart since they are heavy feeders and usually sprawl around on the ground. I'm growing mine  up a trellis and supplementing with Osmocote vegetable food. I plan on thinning out the weakling seedlings (yay for rhyme) in a week or so so that I have 3-5 plants. I'm still unsure if they will even fruit.

Wednesday, August 4, 2010

Holy Squash!

Look at what I just found: http://www.luffa.info/

I've used a "luffa" before and loved it! Now I can grow my own!!! Yeah! I might start a plant in the late winter along with my Chayote. The only problem is where to put the two 30 foot vines . . .


Oh. I've done a lot of gardening lately, just haven't been able to post pictures. I'd rather do them together. Hopefully I'll get a new computer before school starts and actually be able to do more than access internet.

Til' then!!

Friday, July 23, 2010

Alternative

DIY site with paper pots. Just in case. Instructables.com is a decent site to browse ranging from the easy to the not so DIY.

http://www.instructables.com/id/Making-paper-plant-pots/

Sunday, July 18, 2010

Updates

Everything is growing. I'm waiting on a set of window boxes I ordered. They'll be the main "garden area" after I build a holder/table thing for them. The potato might have some mold in the dirt, and some of the planters also have some fungi growing on them.

I think the planters'  mold is because of the flour-paste I used to glue them together, because the growth is mostly on the fold where the two ends of the 'skinny rectangle' meat. So perhaps using a non-glutenous binding agent (i.e. regular white glue) would be better. Or just use the smash method they suggest for non square planters. Also, if you use a newspaper starter planter, I suggest filling them up to the rim with dirt. Doing so will reduce the amount of water loss, since a rim will wick moisture up and lead to quicker evaporation.


The seedlings are doing well though. I have nine plants with maybe one more about to poke out.


They're fairly tall (about 4 inches) and some have started to put out their first real leaves. The one in the foreground is the first sprout, planted in the demo planter. It's the biggest. I water them about twice a day and spritz them with a spray bottle about three times a day.


Potato plant. Can you tell which way the sun comes in? I'll probably add 4 inches of soil in the next day or two in order to encourage tuber growth. I also threw in the left-over planters in there, as you can see. I'm testing to see how long they take to decompose.


Future tomato, right here. I bought a Brandy-wine tomato the other day at the farmers market. Soooo good! Grow tomato, grow!


Thai Basil blossom. Not good for growing leaves, but they're really pretty.


And the pepper plant. Nothing really exciting going on. It's putting out a few more leaves and got some heat damage a few weeks ago. Looks alright I guess.

Sunday, July 11, 2010

Sprouting Already

This morning when I watered my pots, everything was normal. Dirt was in the seedling pods and the big plants were fine.

This afternoon (4:02pm) I went out for the afternoon watering and look what I found!!!!


Yay! Sprouting already. This is even the demo pot! Great Success. Right now it's the only germination that's appeared. I think another pot has a little green just below the surface, but no popping just yet.

I'm so happy.

Friday, July 9, 2010

It's Growing!

My Own Newspaper Planter

 
Perhaps it would have been a "good idea" to look up exactly how most people make starter planters out of newspaper. Instead I jumped it without much of a plan and tried out my own techniques. Now, I do not claim to be master origami-ist, paper folder, or package wrapper. The presents I give come wrapped in wrinkled, crooked, and homely paper no matter how hard I try to be neat. Luckily, these planters aren't meant to be pretty. The newspaper degrades just slowly enough to let some seedling pop-out and ready themselves for transplant. The material works much like a peat-pot but at a cheaper and perhaps a more eco-friendly cost.

The original Newspaper Planters that I saw were made with a round object-tool-thing. I only glanced at the picture and did no reading on how it worked. I tried first with drinking cup. However, newspaper apparently doesn't wrap well around a tapered object. The mashing to make a bottom didn't work well for me either; I was left with a big hole in my cup.I decided folding it into a square would be just as easy. I tried "wrapping" a miniature Chinese food box thing. Once again this object tapers. Didn't work out too well. Then I thought, oh why not just fold it? Who needs and object. Surprisingly, after a few prototypes, a functional folded newspaper planter emerged.

This is a quick photo-tutorial to let you my newspaper planter. So far they've held up pretty well. The other way to do it may be easier. Mine is a ten-step program.


Start with one sheet of newspaper. I cut half of a sheet to get this one (about 15x16). I don't think the size really matters. Maybe if you use a larger one you could fold it more to make stronger walls, but then again that might make it harder to fold.

1. Anyway, fold it in half until you have a skinny rectangle. I folded this one in half once, where the Auburn Orange line is.


2. Fold your skinny rectangle into five parts. These will be the four walls and a flap. Basically fold not quite in half and fold in half again. Where I folded is marked here in Auburn Orange squiggles.


3. Unfold the paper until you have your skinny rectangle back. 

4. Cut about 1/3 the way down the creases, shown here as Auburn Blue boxes. Really, you can cut as much as you want too, as long as it's more than half the length of the "wall sections." The flaps that you are creating in this step will fold down to make the bottom, so make sure they will reach each other. Also: cut the edge-to-edge side of the skinny rectangle, not the middle fold side.  This will make your pot stronger, and prevent dirt from falling into the newspaper.


5. Shape your paper into a prism, bending it at the creases, and wrapping the flap section around the corner of the first.


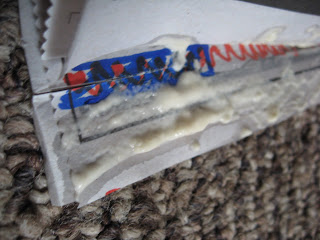
6. To make the flap stick to the first section, I used flour-water paste. It was about the consistency of toothpaste. Flour-water won't harm the plants, and it's really easy to make. I just used my fingers to spread it on. I guess you could get fancy and use a brush.


At this point, your skinny rectangle should be a rectangular prism with two open ends. It should retain it's shape without you holding it. 

7. Fold down the flaps you cut to make the bottom. Start with the section where the two ends of the skinny rectangle meet to make sure that flap holds strong. Between each flap (and maybe between the layers of newspaper) spread some flour-water.


8. Once all four sides are down. Cover the entire bottom with a more watered flourwater paste. About the consistency you would use for paper-mache. This will make the bottom stronger.

9. Let dry overnight. You should have a fairly sturdy, somewhat cute, newspaper planter in the morning!


10. Fill with dirt and a few seeds. Water regularly, keeping the soil moist. These pots don't retain water very well. If seeding different plants, be sure to mark your pots. Here it's "LC" for Lemon Cucumber.


If you're confused (which is very likely, especially on step 4), leave a comment or email me or something. Or figure it out yourself.